.svg "bostongarage")
Applying epoxy floor coating to your garage floor can be a complicated and time-consuming process. However, armed with the right information, you will be able to complete this project efficiently and effectively.
Before you get started, you need to make sure you have all of the tools you need to get the job done right. In general, at least two people should be involved in the floor coating project. You will also need a DIY epoxy floor coating kit, some painters tape, plastic drop cloths and any other application tools recommended by your kit’s manufacturer.
To apply epoxy coating properly, follow the steps below.
1. Read the instructions thoroughly.
Before you begin your project, read through all of your application instructions to make sure you understand each required step. If you have any questions, call the manufacturer for clarification.
2. Inspect the floor.
Many epoxy coatings deteriorate early because the floor was not properly prepared. Make sure that your garage floor is not sealed or painted. If the floor is sealed, the sealant must be removed mechanically. Inspect your floor for cracks and pitting. Make note of these issues so that you can repair them later.
Next, look for visible signs of moisture on the garage floor. Most epoxy coatings can withstand a certain amount of moisture, but too much moisture will cause the coating to fail. If you find visible signs of moisture, perform a calcium chloride test to determine whether your floor will accept the coating.
3. Clean the floor.
Sweep all debris off your garage floor. Remove oil and grease stains from the concrete, along with any other material that will prevent the coating from properly adhering to the floor.
4. Profile the floor.
After the floor has been properly inspected and cleaned, you must profile the floor to expose all of the concrete’s pores. Because this step ensures that the epoxy is able to bond with the floor, it is one of the most important parts of the process. To profile the floor, you can either grind the surface mechanically or you can use acid etch. In most cases, either method will work. However, professional installers typically use mechanical grinding.
If you choose to use acid etch, make sure you give the floor enough time to dry before moving on to the next step. If you choose to grind the floor, be sure to remove all of the dust before applying the epoxy.
5. Repair any problems.

If you have cracks or other problems with the floor, repair them with an appropriate product. If desired, you can also take this opportunity to fill in contraction joints.
6. Get ready to apply the epoxy coating.
Depending on the layout of your garage floor, you may need to tape off the floor. Tape must be replaced between coats. For best results, apply your coating when the temperature is between 55 and 90 degrees Fahrenheit. Humidity should be less than 85 percent.
7. Mix the coating.
Tape down a tarp and use it as your mixing area. If the resin or hardener has settled, mix each component separately before combining them. Follow the manufacturer’s instructions for mixing the resin and hardener together. Typically, you will be required to pour hardener into the mixing bucket first. Next, you will add the resin to the bucket and mix the two components together with a mixing paddle and drill. The epoxy is completely mixed when it has no color streaks and an even consistency.
Many garage floors are too large to coat with one batch of epoxy, and the amount of time you will have to apply the epoxy after it is mixed is limited. For best results, work in sections and mix only what you need.
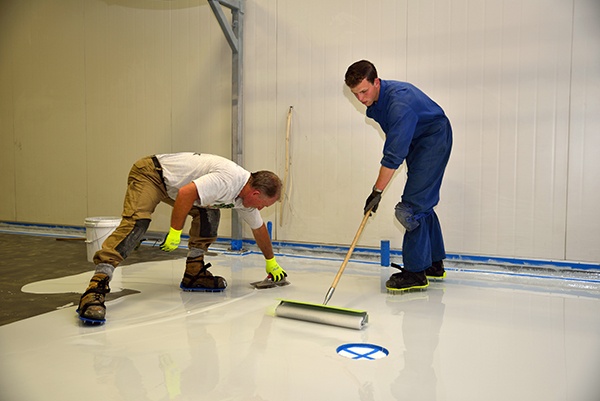
8. Apply the first coat.
The first coat applied to your floor may be a color base coat or a primer coat. The manufacturer’s instructions will tell you how long you have to apply this coat once it has been mixed. Get to work immediately by pouring the epoxy into the appropriate section of the floor. When pouring, start at the back of the section and work your way forward, pouring the epoxy in strips.
Begin rolling out the epoxy, beginning in the back corner of the section. Keep the roller well loaded with epoxy to prevent air bubbles from forming in the coating. Once you’ve rolled out the entire section, back roll it to eliminate roller marks and other imperfections.
9. Complete for all sections.
If you are working in sections, repeat the process for each of the other sections until the entire floor is covered. Keep a wet edge at all times. Otherwise, the line between your sections may be noticeable after the epoxy dries. For best results, keep your wet edge as short as possible.
10. Allow the coat to cure.
Consult your manufacturer’s instructions to determine how long your first coat needs to cure before you can begin applying the next one. Use this time to clean all of your tools and your workspace. While the coat is curing, do what you can to prevent bugs, animals and debris from getting into the epoxy.
11. Apply the second coat.
Once your floor is ready for its next coat, follow the steps above to apply it. If you aren’t sure whether or not the floor is ready for its next coat, press your thumb gently into the epoxy. If it leaves a print or feels very tacky, allow it to dry more before beginning the next coat.
As you apply the second coat, keep in mind that vinyl color flakes should be applied to the floor within ten minutes of epoxy application. This is especially important to remember if you are working in sections.
12. Apply your topcoat.
Once the second coat has cured in accordance with the manufacturer's instructions, use the same procedure to apply your topcoat. If you are including a non-slip additive, now is the time to add it.
Follow these steps or consider letting the professionals apply your garage floor coating. For more epoxy coating tips orprofessional assistance, contact Boston Garage today!